How to Create a New Location in Instagram


The most common reason to create a new location on Instagram is that you’ve just started a new business. If you wish to be taken seriously, potential customers should be able to find you easily.
Moreover, Instagram’s location is a really cool feature. Other people can use your location as well, and you can then repost their photos. That’s why we’re going to show you how to create one.
Before You Start
As of now, Instagram doesn’t allow you to create a new location in its app. Wait, what? But haven’t we just said that you could create a new location for your business? Don’t worry. There’s an easy way to create a new location. However, you’re going to need the Facebook app.
Facebook allows you to create as many custom locations as you want. As Facebook and Instagram are connected, once you create a Facebook location, it’ll appear on Instagram as well. The good news is that you don’t even have to connect your Facebook and Instagram. Everything’s done automatically.
Creating a New Location
If you’ve prepared your phone and have the Facebook app, we can start. Here’s what you have to do:
- Log in to your Facebook account.
- Tap on Check-in.
- Type the name of your new location.
- Tap on Add.
That’s it! You now have a new location you can use both on Facebook and Instagram.
Note: Be sure to turn on location on your phone and allow the Facebook app to access it. If you don’t, Facebook won’t be able to recognize your location.
Use It on Your Instagram Profile
Your location is ready! All you have to do now is go on Instagram and let everyone know about it. You can use your location on your posts and your stories. We suggest you use it for both. In fact, research shows that users more often click on a location they see in someone’s stories because they want to learn more.
Therefore, don’t forget to add a location to your stories! Here’s how:
- Take a photo or add an existing picture to your story.
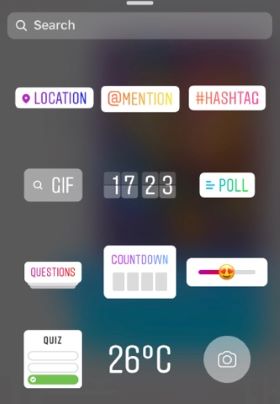
- Tap on the little square at the top of the story (next to emoticon and doodle).
- You’ll see many additional options.
- Select Location.
- Type the name of your location.
- Tap on Save.
- Post your story.
When it comes to adding the location to your posts, it’s even easier. All you have to do is tap on Add a location and enter the name. Did you know that you can also add the location to your older posts? Maybe you have a lot of photos from a particular place, but you didn’t know about the location feature at the time. You can fix that now. Here’s what you need to do:
- Open the post you want to add the location to.
- Tap on the three dots in the top right corner.
- Tap on Edit.
- Tap on Add Location.
- Type the name of your location.
- Tap on Done.
There you have it! We hope that your new location will bring you more popularity, more customers, or anything you may be looking for!
I Can’t Find My Location on Instagram
Although you should be able to see your location on Instagram as soon as you’ve created it on Facebook, that’s sometimes not the case. It usually means that something is going awry with Instagram, and it needs more time to process the new information.
However, there’s one thing you can do. Some people believe you might need to activate the location first. That’s very easy. All you have to do is post something on Facebook using your new location. That way, the app will see that it’s a real location, and you should be able to use it on Instagram as well.
Another reason why you can’t see your location on Instagram might be because the app considers it too weak. But what does that mean? If you’ve forgotten to pick a category for your location, the algorithm may think that you’ve just created a random place that may not even exist.
Make sure always to add a correct category, especially if you have a business. It doesn’t have to be very specific, but things like “retail”, “hospitality”, etc. should do the job for you. We only suggest you avoid the category “Just for fun”. As its name suggests, even Instagram doesn’t take it too seriously.
Potential Name Problem
You can type the name of your new location in the Facebook search bar, just to find out if a place with the same name already exists. This can be very frustrating as Facebook won’t allow you to register the same name twice.
However, all you have to do is slightly modify the name and register it. This can seem like a challenge, especially if you have a business, as that’s simply its name. But no, you don’t have to change the name of the company. You can add a little modifier.
For example, let’s say you live in San Francisco and have a flower shop called My Garden. Chances are someone in the world has a flower shop with the same name. There are two things you can do. First, you can add the name of your city, or maybe the name of your neighborhood. In this case, your name can be “My Garden San Francisco”.
Another trick is to add the word “Official”. It’s such a powerful word, and it makes you sound more reliable. Which of the following sounds better to you: My Garden or My Garden Official? See, that’s what we’re talking about.
Stay Safe
The only thing we have to add is that you should be very careful if you create a location that’s actually your home. No matter how you name it, “My Happy Place” or “Home, Sweet Home”, be aware that all your followers will be able to see your home address. For obvious reasons, you may not want that.
Have you already created some locations? Did you have any issues? Let us know in the comments section below.