How to Add Reviews on Shopify

There’s more to running an online store than just posting pictures of your products. Potential customers like to know as much as possible about what they’re ordering. Therefore, detailed and accurate descriptions are essential. More importantly, prospective customers want to read about other people’s experiences.
Bad reviews can be deal-breakers, especially if a customer hasn’t ordered from a particular seller before. Good reviews, however, can attract new shoppers in no time. If you have your share of good reviews, here’s how to add them to your Shopify page.
Share Reviews via the Product Reviews App
The best way to share product reviews is to use an app from the Shopify app store. The most frequently used app is the Product Reviews app.
This well-rated app allows you to share your customers’ experiences quickly and without complicated steps. What’s more, it’s free, compatible with any webpage theme and design, and easy to customize.
The Product Reviews app is also known to help with SEO results and ranking on Google. The higher you rank, the better chances you have to reach more consumers and increase your sales. The Product Reviews app encourages your customers to engage with you and gives you a chance to reply to their comments as well.
With Product Reviews, you can import and export reviews in the form of a spreadsheet, and manage them in a couple of clicks. You don’t need to publish or remove reviews one by one – there’s a convenient bulk actions feature to deal with them.
Adding the reviews will require a bit of coding. This may sound complicated at first, but if you carefully follow the steps explained in the Shopify official manual for this app, you’ll set up the feature in no time.
In short, the way you’ll add reviews to your page depends on the theme you’re using. If it’s a sectioned theme, which is also newer, you should:
- Open the Online Store and then click on Themes.
- Look up the desired theme and select Actions.
- Choose Edit code and from the Sections directory, click on product-template.liquid.
- Decide where you want the reviews to appear and paste this:
<div id=”shopify-product-reviews” data-id=”{{product.id}}”>{{ product.metafields.spr.reviews }}</div> - When you’re done, select Save.
If you’re using a non-sectioned theme, follow the instructions below:
- Go to your Online Store and open the Themes section.
- Select the desired theme and choose Actions.
- From here, select Edit code.
- From the Templates directory, click on product.liquid.
- Choose where you want your reviews to appear on your products page and paste this:
<div id=”shopify-product-reviews” data-id=”{{product.id}}”>{{ product.metafields.spr.reviews }}</div> - Select Save to complete the edit.
How to Manage Your Reviews
When you get started, you’ll probably want to turn off the automatic review publishing. This will allow you to check each review before they’re visible to everyone. To switch this feature off, follow the steps below:
- From the admin dashboard, select Apps.
- Click on Product Reviews and then choose Settings.
- Find the Auto-publish option and select Disabled.
- Select Save to keep your changes.
If you want to publish a review, choose Unpublished from Product Reviews and select the review you’d like to post. Click on Publish to confirm. Bear in mind that you can use bulk actions to publish a large number of reviews simultaneously. Bulk actions can also be used to unpublish, delete, or unflag reviews.

Follow the same steps to unpublish an undesired review. You can also remove it by clicking on Delete after you’ve selected the review you want to eliminate.
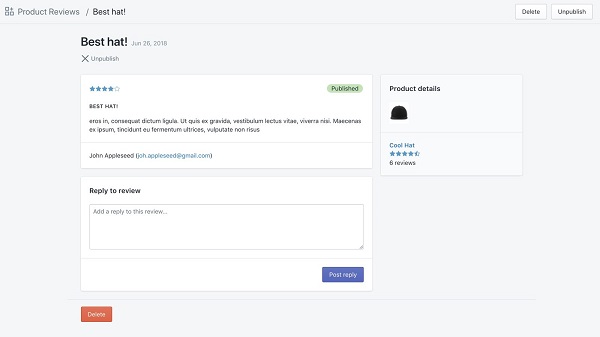
If you wish to post a reply to a review, do the following:
- Open your admin panel.
- Select Apps.
- From there, go to Product reviews and choose the desired review.
- You’ll be taken to the review page.
- Type in your reply in the corresponding field.
- Select Post reply to publish your message.
Other Useful Apps for Adding Reviews
1. Opinew Product Reviews App
The Opinew Product Reviews App is another excellent choice if you want to add reviews to your products. Via this app, you can combine both photo and text reviews, safe in the knowledge that the reviews will fit into your webpage design and won’t slow down loading speeds.
It also enables you to import reviews from all major platforms such as Amazon, Ebay, or Aliexpress. It’s easy to set up and adjust to your theme. Also, the reviews won’t appear on your page automatically – you’ll be able to verify and approve them before they’re posted.
Customers will also be able to add star badges to your products and collections.

2. Stamped.io
With a free plan available, Stamped.io is another popular app for sharing customers’ experiences. This app lets you collect all types of reviews from different places and use them to boost your sales.
Stamped.io collects user-generated content, which can be used to build trust and increase conversions. This content includes FAQs, Instagram galleries, photo and video reviews, product reviews, and more.
This app is highly optimized and highly responsive for mobile phones and other types of devices. It will fit into any design and work well with your theme. It’s easy to set up and even easier to manage, thanks to useful features such as filtering reviews by topic, review verification, review search option for customers, and more.

Completing Your Online Store
Without customer reviews, it looks like something’s missing from your online store. Adding reviews may take some time, but it sure will pay off as soon as positive experiences from your customers start flooding in. Make sure you publish less positive reviews as well as reply to everyone – this way, the reviews and star badges will retain authenticity and value.
What app will you use to add reviews to your web store? Let us know in the comments section below.