How to Send a Message on Schoology

Probably one of the best virtual learning environments out there, Schoology also doubles as a social networking service. It allows its users to create, manage, and share academic content using LMS (Learning Management Systems) and CMS (Course Management Systems) on a cloud-based platform.
The social media features of the platform simplify collaboration within a class, a group, or a school. One of the best ways of utilizing the social media aspect of the platform to its fullest extent is by understanding the full capabilities of the messaging system. Here is some information on the messaging system and how to use it:
Before We Begin
As Schoology is used by many different schools and universities around the country, there are various settings in place depending on the needs of the institution. This means that some of the following options may not apply, and unless it is indicated by the System Administrator you will not be able to send and receive messages.

Sending a Message Using the Top Menu
You can use the top menu to quickly and easily access your messages from anywhere within Schoology. When you receive a new message, a yellow number indicator will appear on top of the message icon. The indicator will remain until the message is opened. To send a message from the top menu, follow these steps:
- Click on the message icon in the top menu.
- Click New Message.
- A new window will appear on the screen. First, you should enter the recipient’s name in the “To” field. As you type, a list of users will appear and you can select the appropriate user from there.
- Enter the subject and message.
- Click Send.
If the name of the intended recipient doesn’t appear on the list while you are typing, it means that they’ve restricted messaging in their Privacy Settings. If you would like to do the same:
- Click your name in the top right corner of any page
- Select Settings
- Click Privacy Settings
- From there, you pick what content can be seen by what group of people. Find the combination that works best for you.
Sending a Course or Group Message
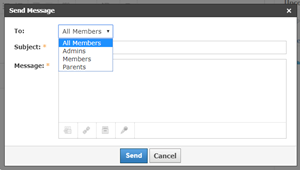
Admins can send a Schoology message to all members of the course or group. To send a course or group message, do the following:
- Click the course or group that you want to send a message to. Only possible if you re the admin of that course or group.
- Click Course/Group Options on the left side of the menu.
- Click Send Message.
- Enter the subject and the content of the message.
- Click send.

When a user replies to a group message, it will not be seen by everyone in the group. Instead, the correspondence will remain private between the member and the administrator.
Sending a Response to a Received Message
Your school’s settings may not allow you to send messages, but you will still be able to receive messages. If you want to respond to a message:
- Click the message icon in the top menu.
- Click on the message you would like to open to view its contents.
- Enter a response.
- Click send.
If you reply to a message that had multiple recipients, all of them will be able to see your reply. If you want to reply to the sender directly, use the next method (see below).
Responding to a Message Using an Email Account
To be able to receive email notifications, you will have to set your Schoology permissions appropriately:
- Click the arrow next to your name on the top right side.
- Select Settings.
- Click the Notifications.
- Choose On, Off, or Custom.
- Click Save Changes at the bottom.
To reply to a message directly from the notification:
- Click Reply in your email account
- Respond as if it was a regular email.
Sending Messages from Other Areas
You may also send messages from any place the user’s information is available, such as:
- The Members area of courses and groups.
- When searching for a person using the magnifier icon.
- The Faculty area on the school profile.
- User Profiles.
Clean Interface, Intuitive Messaging System
As you can see, sending messages in Schoology is really easy to do, and it has plenty of options and settings to customize who can see and reply to your messages.
Was the guide helpful? Did we leave something out? Tell us in the comments!